Chapters
- 1 Getting started
- 2 The interface
- 3 Coordinate systems and conventions
- 4 Modelling
- 5 Materials
- 6 Sections
- 7 Supports, releases and modifiers
- 8 Loads
- 9 Load combinations
- 10 Meshing
- 11 Static analysis
- 12 Dynamic and seismic analysis
- 13 Results
- 14 Design
- 15 Scripting and the AI model builder
- 16 Import and export
- 17 Verification
- 18 Scope and limits
- 19 Troubleshooting
- 20 Glossary and notation
On this page
The FEA Tool is the analysis workspace of TensorNode. It holds a three-dimensional model of nodes, frame members and areas, runs linear, second-order, dynamic and nonlinear analyses on it, and sends the member forces to the TensorNode design modules, where each member is checked to the code of your project. This chapter explains what the tool does, how to open it, and how to build, analyse and design a first model in a few minutes.
1.1 What the FEA Tool does
A model in the FEA Tool is made of:
- nodes (joints) with six degrees of freedom each: three translations and three rotations;
- frame members between two nodes, which can be beams, columns or braces (frame elements with bending, shear, axial force and torsion), trusses (axial force only) or cables (axial force, tension only in a nonlinear analysis);
- areas between three or more nodes, which can be shells (bending and membrane action), plates (bending only) or membranes (in-plane action only), meshed into finite elements automatically;
- supports, springs, end releases, rigid end offsets and property modifiers;
- load patterns with joint, member, area and temperature loads and self weight, and load combinations, typed in or generated from the load combination clauses of AS/NZS 1170.0, ASCE/SEI 7-22, NBC 2020 or EN 1990.
The analysis types are linear static, P-Delta, buckling, modal (eigenvectors or Ritz vectors), response spectrum, equivalent lateral force, storey checks, linear time history, nonlinear static, pushover and nonlinear time history. Chapters 11 and 12 describe each one with its method.
After an analysis, the Design tab sends each member to its TensorNode module (for example Steel Member, Beam-Column or Column Interaction) with the design actions of the strength combinations, and lists the utilisation and the governing check of every member. Slabs and walls modelled with areas get the reinforcement they need from the area forces (Wood-Armer and Nielsen, Section 14.8).
1.2 Opening the FEA Tool
Open the app at tensornodehq.com/app and press FEA Tool in the header of the app. Adding #fea to the address of the app opens the tool directly. The FEA Tool opens in its own window over the app; Esc or the close button at the top right returns to the app, and the model stays open until you start another one or reload the page.
What you can run depends on your plan. An analysis type that your plan does not include is shown greyed out in the Analysis tab with a short note, and a model larger than your plan allows is refused before the run with the reason. See Pricing for the plans.
1.3 A first model from a template
The quickest way to a working model is a template:
- In the Model tab, open New model and pick a template, for example 3D portal frame building or Multi-storey frame.
- Fill in its form (spans, bays, storey heights, sections, loads) and press Create model. The template makes the nodes, members, supports, load patterns and the load combinations of the code chosen in the header (Design code).
- Open the Analysis tab, keep Linear static, and press Run linear static analysis (or press Ctrl+Enter).
- Open the Results tab. Pick Forces and M3 to see the bending moment diagrams, or Deformed to see the deflected shape, and choose a load case or combination.
- Open the Design tab and press Run design. Each member is designed in its module and the table lists its utilisation, status and governing check. Open in module shows the full calculation of one member.
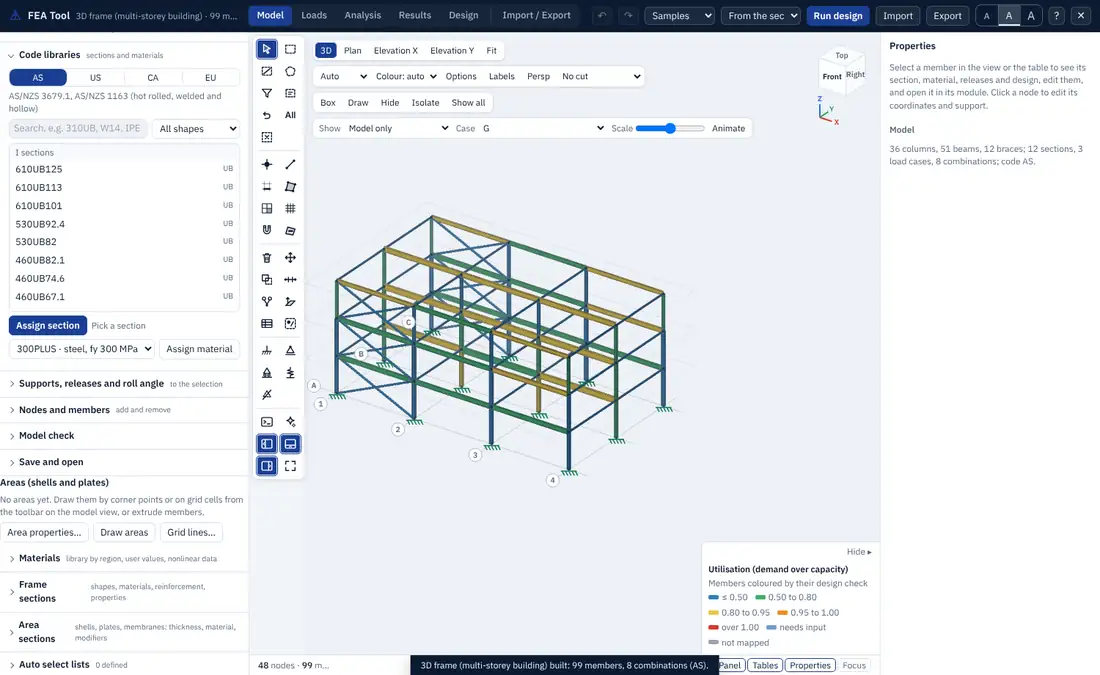
1.4 A first model by script
The same steps can be written as a script in the console (the Script console button of the modelling toolbar, or the key `). The script below builds a 5 m steel cantilever, loads its tip and reads the results. It runs as written in Python; Chapter 15 gives the JavaScript form.
tn.new_model("AS", "Cantilever")
tn.add_node(0, 0, 0, "A")
tn.add_node(5, 0, 0, "B")
tn.add_frame("A", "B", "310UB40.4", "B1")
tn.set_support("A", "fixed")
tn.add_load_case("P", "live", 0)        # no self weight in this pattern
tn.add_nodal_load("P", "B", 0, 0, -10)  # 10 kN down at the tip
await tn.run("linear")
print(tn.displacements("P", "B"))       # [ux, uy, uz, rx, ry, rz] in m and rad
print(tn.reactions("P", "A"))           # [Fx, Fy, Fz, Mx, My, Mz] in kN and kNm
With mm⁴ for a 310UB40.4 and GPa, the bending deflection of the tip is
and the FEA Tool reports a little more, about 24.4 mm, because the frame element includes the shear deformation of the web (Section 11.2). The support reaction is 10 kN upwards with a moment of 50 kNm about global Y. Checking a new model against a hand value like this takes a minute and is a good habit.
1.5 Saving and opening models
Ctrl+S, or Save and open in the Model tab, saves the model as a JSON file (<name>-fea.json) that holds the whole model: geometry, sections, materials, loads, combinations, grids, groups, display units and the settings of the seismic and design panels. Open a saved file with Import in the header, by dropping it on the model view, or from Save and open. Results are not saved in the file; run the analysis again after opening a model.
The FEA Tool keeps an undo history of every edit: Ctrl+Z undoes and Ctrl+Y redoes. A script run, a template build, a section optimisation and an "Iterate for me" sequence of the Design Expert are each one undo step.
1.6 Where to go next
- The interface explains every part of the window.
- Modelling covers drawing, selection and editing.
- Loads and Load combinations cover the actions.
- Static analysis and Dynamic and seismic analysis describe the methods.
- Troubleshooting lists the messages of the model check and what to do about each.